Ex3: Navigation
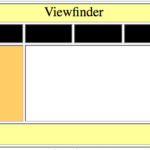
In this exercise you will use the buttons below to create a page with several kinds of navigational links. You will create text rollOver links, image rollOver links and links made from images.
Procedure:
Step 1: Set up
- create a Ex3 folder in your Exercise folder
- open Dreamweaver and create a new HTML document
- drag the right edge of the display screen to be about 995 pixels wide
- insert a table with 4 rows and 4 columns (insert –>table)
- choose top for header style in popup menu
- designate 900px width the table in the popup menu /or change the code from 200 to 900 pixels wide in code view
- in the first table row <tr>, remove all but one of the <th> cells
- in the <th> tag type colspan=”4”, this merges cells in row 1
- add the any text center aligned in the top row in large letters
- in row three, delete two <td> tags
- in the second <td> tag add colspan=”3” to merge cells
- in row four delete all but 1 <td> tag and add colspan=”4” to merge cells
- color the cells in your table
- Select cells, then in the properties window (Windows>Properties) set the background colors (Bg) You can use any HTML method (RGB, HEX, HSLa)
- save the page as navigation.html
Step 2: Adding hover buttons in css
- download the zip folder ButtonImages.zip from Blackboard under course resources and place the folder into your ex3 folder. Or cntrl/right click on the images above and Save As Picture each into your Ex3 folder.
- rename the ButtonImages folder to btn
- Place this code in between <style> </style> tags above the closing head tag:
.redrect {
background: url(“btn/rectRed.png”);
height: 89px;
width: 267px;
position: absolute;
}
.redrect:hover {
background: url(“btn/rectYellow.png”);
}
- using the code above, copy and paste again, and rename class to .redrect2
- update the background-image url to use the rounded red and yellow images: roundedRed and roundedYellow
- in the first column of the third table row, update the HREF attribute to go to:
- https://kevinvalentine.net/teaching/med105
- insert target=”_blank” to open the url in a new window
- do the same for the second column in third row but link the href to your favorite website
Step 3 – picture links
- in the first column of the second row insert an original image with a width of 267px
- select the image and in the properties panel set the link to http://viewfinder.noctrl.edu
- set the target to _blank to make it appear in a new window
- save the page and test your link
Step 4 – plain rollOver links
- in green text add “one”, “two” and “three” in the second, third and forth cell of the second row (one in each)
- select the “one” text and in the properties panel give a value to the link field to make it go to a web page (any page you like)
- do the same for “two” and “three”
- in the properties panel choose page properties
- set the link color to green, do the same for visited links
Step 4 – plain rollOver links
- in yellow text add “one”, “two” and “three” in the second, third and forth cell of the black row (one in each)
- select the “one” text and in the properties panel give a value to the link field to make it go to a web page (any page you like)
- do the same for “two” and “three”
- in the properties panel choose page properties
- set the link color to yellow, do the same for visited links
- copy & paste the following CSS code into the head section. This code will make rollovers for text hyperlinks<style fprolloverstyle>
A:hover {color: #FF0000; font-weight: bold}
body,td,th { color: #000; }
</style> - save your page and test your links
Step 5 – Copy & paste the following CSS code into the head section. This code will make rollovers for text hyperlinks. (if there is an orange hover class in the style sheet ignore this step).
a {
color: green;
text-decoration: none;
}
a:hover {
color: orange;
}
- You may have to add code to change the height of some rows: (Example is for row 3)
tr:nth-child(3) {
height: 400px;
}
- And style the table as well:
table {
font-family: arial, sans-serif;
border-collapse: collapse;
width: 80%;
border: solid 1px #000;
}

My Links